


|
|
|
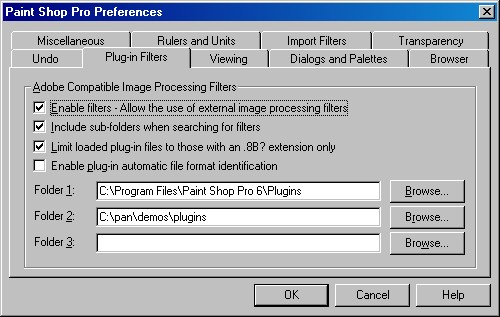
PaintShop Pro (PSP) can host PhotoShop® filters, and the Pan compiler can create such filters. We used to use this ability heavily in order to make rendering at higher than screen resolution, and to smooth them out, as described below. Now, however, the component viewer can do both of these functions by itself. (See these directions.) PSP is still useful with Pan to "paste" after a Pan viewer "copy" operation, and then save in whatever format is desired, as well as to make multi-layer collages. IngredientsFirst, of course, get JASC PaintShop Pro. Start with the free 30-day trial version to see whether you like it. It has all of the abilities of the full version. Then download one or more plug-ins as directed on the Pan Releases page. Under the File menu, choose "Preferences" and then "General program preferences ...", and then the "Plug-in Filters" tab. Pick a free folder entry (e.g., Folder 2), and use the "Browse..." button (or type-in box) to select the directory in which you store your pan plug-ins. For instance, mine looks as follows:
Try it
Some effects, like "soft crop" apply to source images. Others are simply synthetic images. In the latter case, the procedure is similar, but instead of opening an existing image, you make a new one with File/New (or the New button). The size and resolution you choose in the "New Image" dialog box determine the final image's size and resolution. For web page use, you'd want to use monitor resolution, which is about 80 pixels per inch, while for printing, a choice of 300 or so is good. Remember: because pictures are two-dimensional, doubling the resolution means quadrupling the storage size. Smooth away those jaggiesIf you look carefully, you'll see that many plug-ins produce "jaggies" -- a stair-step appearance where you'd want to see smooth straight or curved edges. These jaggies come from the fact that an ideal continuous picture is being approximated by lots of discrete pixels. You can smooth away those jaggies, at the cost of introducing some blurring. (Since the "soft crop" effect shown above has built in softness, it doesn't need an extra smoothing step.) Fortunately, PSP has a few different blurring tools that help out here, and you'll find them in the Image menu under "Blur". A simple blurring tool is the one called "blur". For example, these two images come from the "polar checker" plug-in, with the right one having been softened.
Blurring eliminated most of the jaggies, but the resulting image is too blurry. What we really need to do is to re-render our picture at a larger size, then smooth, and then reduce the size (using Image/resize). The following picture was rendered at double size and halved after blurring. It is both smooth and sharp.
Conal Elliott
|